How to Cook Steak in 3 Ways
Few meals carry the same sense of occasion as a perfectly cooked steak. Whether it’s a casual weeknight dinner or a special celebration, steak has a way of making any meal feel elevated and intentional. And yet, for all its prestige, cooking steak well is something that intimidates many home cooks more than it should. The truth is that mastering steak comes down to understanding a few fundamental principles — heat management, timing, seasoning, and most importantly, internal temperature.
An instant read thermometer is the single most important tool you can have beside you when cooking steak, because it removes all guesswork from the most critical variable in the process. With that tool in hand and a solid understanding of three reliable cooking methods, consistently great steak becomes entirely achievable for any home cook.
Understanding Steak Doneness Before You Begin
Before diving into cooking methods, it’s essential to understand what you’re aiming for — and why temperature is the most reliable guide to get you there.
Steak doneness is measured by internal temperature, and each level of doneness corresponds to a specific temperature range:
- Rare: 49°C to 52°C (120°F to 125°F) — Deep red center, very soft texture
- Medium-Rare: 54°C to 57°C (130°F to 135°F) — Warm red to pink center, tender and juicy
- Medium: 60°C to 63°C (140°F to 145°F) — Pink center, firmer texture
- Medium-Well: 65°C to 68°C (150°F to 155°F) — Slightly pink, noticeably firmer
- Well Done: 71°C and above (160°F+) — No pink, fully firm
Medium-rare is widely considered the optimal doneness level for most cuts, as it preserves the most moisture, tenderness, and flavor. However, personal preference always has the final say.
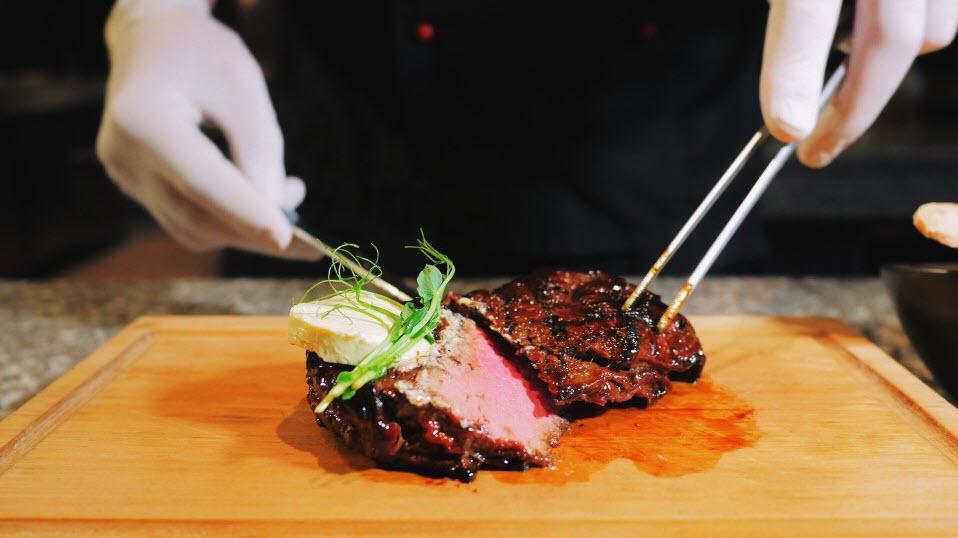
One important concept to keep in mind is carryover cooking. After steak is removed from the heat source, its internal temperature continues to rise by approximately 2°C to 5°C (3°F to 8°F) during the resting period. This means you should pull the steak from heat slightly before it reaches your target temperature, then allow it to rest covered loosely with foil for five to ten minutes.
Now, on to the three methods.
Method One: Pan-Seared Steak
Pan searing is the most popular method for cooking steak indoors, and when done correctly, it produces a deeply caramelized crust with a juicy, tender interior that rivals anything served in a steakhouse.
Best cuts for this method: Ribeye, New York strip, sirloin, flat iron
What you’ll need: A cast iron skillet or heavy stainless steel pan, high smoke point oil, butter, garlic, and fresh herbs
The process:
Start by bringing your steak to room temperature. Remove it from the refrigerator at least 30 minutes before cooking. This promotes more even cooking from edge to center. Pat the steak completely dry with paper towels — moisture on the surface creates steam, which inhibits browning. Season generously with salt and freshly ground black pepper on all sides.
Heat your skillet over high heat until it is smoking hot. Add your oil and place the steak in the pan. Resist the urge to move it. Let it sear undisturbed for two to three minutes depending on thickness, until a deep brown crust forms. Flip once and sear the other side.
At this point, reduce the heat slightly and add a generous knob of butter along with crushed garlic cloves and sprigs of fresh thyme or rosemary. Tilt the pan and use a spoon to continuously baste the steak with the foaming butter — this technique, known as arroser, adds flavor and helps the steak cook more evenly.
Use your instant read thermometer to check the internal temperature at the thickest part of the steak, avoiding contact with the pan. When it reads approximately 3°C (5°F) below your target doneness, remove the steak and rest it on a warm plate. The carryover heat will take it to the perfect finish.
Tips for success:
- Never crowd the pan — cook one steak at a time if necessary
- Sear the fat cap by holding the steak on its edge briefly before resting
- Always rest before cutting to allow juices to redistribute
Method Two: Oven-Finished Steak (Reverse Sear)
The reverse sear method has gained significant popularity among serious home cooks and food enthusiasts because of how consistently it produces even doneness from edge to edge — something that is difficult to achieve with direct heat alone.
Instead of searing first and finishing in the oven, the reverse sear flips the process: low oven heat is used first to bring the steak to just below the target temperature, followed by a high-heat sear for the crust.
Best cuts for this method: Thick-cut ribeye, tomahawk, T-bone, porterhouse — particularly effective for steaks 2.5cm (1 inch) thick or more
The process:
Preheat your oven to a low temperature — around 120°C to 135°C (250°F to 275°F). Season the steak generously and place it on a wire rack set over a baking sheet. This allows air to circulate around the entire steak.
Place the steak in the oven and cook slowly until the internal temperature reaches approximately 8°C to 10°C (15°F to 20°F) below your target doneness. For medium-rare, you’re aiming to pull it from the oven at around 46°C (115°F). Check regularly with your instant read thermometer during this phase — the low, even heat means the temperature rises gradually and is easy to manage.
Once the steak reaches the target pre-sear temperature, remove it from the oven and allow it to rest briefly while you heat a skillet to smoking hot. Sear the steak for 60 to 90 seconds per side — because the surface of the steak is already warm and relatively dry, the crust develops extremely quickly without overcooking the interior.
Why this method excels:
- Produces perfectly even doneness throughout the steak with no gray overcooked band around the edges
- The surface dries out in the oven, leading to an exceptional sear
- Easier to time and manage, particularly for dinner parties or multiple steaks
Method Three: Grilling
Grilling steak outdoors over live fire or gas is one of the oldest and most satisfying cooking methods available. The high heat, smoke, and char that grilling produces create a flavor profile that no indoor method can fully replicate.
Best cuts for this method: Ribeye, T-bone, porterhouse, skirt steak, flank steak, strip steak
The process:
Preheat your grill thoroughly. For charcoal, this means allowing coals to become fully ashed over and glowing — typically 20 to 30 minutes. For gas, preheat on high for at least 10 minutes. You want the grates very hot to achieve proper sear marks and caramelization.
Season your steak generously, then oil the grates lightly to prevent sticking. Place the steak directly over the hottest part of the grill. Cook for two to three minutes on the first side without moving it. Rotate 45 degrees to achieve crosshatch grill marks if desired, and cook for another minute or two. Flip and repeat on the other side.
For thicker steaks, finish using a two-zone method — move the steak to the cooler side of the grill after the initial sear and allow indirect heat to bring the internal temperature up to your target. This mimics the oven-finishing approach and prevents the exterior from burning before the interior is properly cooked.
Use your instant read thermometer frequently during grilling, as outdoor temperatures and flame intensity make heat management less predictable than indoor cooking. Insert the probe horizontally into the side of the steak at the thickest point for the most accurate reading. Pull the steak from the grill 3°C to 5°C (5°F to 8°F) below your target and rest it away from direct heat.
Tips for grilling success:
- Never press down on the steak — this forces out precious juices
- Keep the lid closed as much as possible to maintain consistent heat
- Have a cooler zone ready for managing flare-ups
The Universal Rules That Apply to All Three Methods
Regardless of the cooking method you choose, certain principles apply universally to cooking great steak:
Season properly and early — Salt applied at least 45 minutes before cooking draws surface moisture out and then reabsorbs it, seasoning the meat more deeply and drying the surface for better browning.
Use your thermometer, every time — Intuition and experience help, but there is no substitute for accurate temperature data. The difference between a perfect medium-rare and an overcooked steak is just a few degrees.
Rest without exception — Five to ten minutes of resting time allows muscle fibers to relax and juices to redistribute. Cutting into a steak too early results in those juices pooling on the cutting board rather than remaining in the meat.
Slice against the grain — For cuts with visible muscle fibers like skirt or flank steak, cutting perpendicular to the grain shortens the fibers and dramatically improves tenderness.
Great steak is not the product of luck or secret technique — it is the result of understanding the process, using the right tools, and giving each step the attention it deserves.